CONOCIMIENTOS · PROGRAMAS DEL SCRIPT
¿Cómo cerrar su sitio web usando el kit de herramientas Wordpress de cPanel?
Última actualización 2022-12-04
Editar un sitio de producción de WordPress es como detallar su coche mientras que él se limitan;s conducir por la autopista. Tú eres un hombre.podría ser arrive en tu destino a tiempo y lucir bien. Entonces, de nuevo, todo podría ir terriblemente mal, y si lo haces con frecuencia, suficiente, consagramiento; tu suerte se acabará eventualmente. " Nbsp;
nbsp;
Si un negocio depende de su sitio de WordPress o tienda WooCommerce, editar la instalación de producción en vivo simplemente no vale la pena el riesgo. Los sitios de estadificación de WordPress, también llamados sitios de desarrollo o sitios de pruebas, son la alternativa segura. " Nbsp;
nbsp;
En este artículo, explicamos lo que necesita saber sobre los sitios de WordPress de estadificación, por qué debe utilizarlos, y cómo cPanel plagarsquo;s WP Toolkit (WPT) hace fácil de desplegar un sitio de estadificación y sincronizar los cambios de nuevo al sitio de producción. " Nbsp;
nbsp;
¿Qué es un WordPress empanbsp; Sitio de mensajes?
Un sitio de estadificación es una copia clonada de un sitio de producción. Tiene los mismos datos y archivos, pero es conveniente para el público, y es accesible para él; y suele ser hospedado en un subdominio diferente. Cualquier cambio que haga a un sitio de estadificación no se transfiere al sitio de producción a menos que desee que sean. Debido a que se trata de un clon hospedado en el mismo ambiente, se comporta como el sitio de producción, lo que lo convierte en el terreno ideal de pruebas.
nbsp;
En el pasado, crear un sitio de estancamiento o desarrollo era complicado y consumía mucho tiempo. Tuvo que exportar datos de la base de datos de producción, crear una nueva base de datos, importar los datos, copiar los archivos, reconfigurar el sitio y configurar un subdominio de estadificación. Luego usted tiene que revertir el proceso para desplegar los cambios en la producción. " Nbsp;
nbsp;
Esa complejidad es por qué muchos usuarios de WordPress donan puntos de estancamiento; no utilizan los sitios de estancamiento, en lugar de optar por el arriesgo acto de cable alto de editar un sitio en vivo ocupado. Sin embargo, si usted alberga sitios de WordPress en un servidor gestionado por cPanel & WHM, todo el proceso toma sólo unos pocos clics.
nbsp;
¿Por qué necesitas un sitio de estadificación?
Hay muchas situaciones donde se limitan a los clientes; es una buena idea para desplegar un sitio de WordPress para probar los cambios antes de comprometerse a ellos. Idealmente, cualquier cambio más complicado que publicar un post se pone a prueba a fondo antes de que se vaya a vivir.
Los casos de utilización para los sitios de estadificación incluyen:
- Prueba de nuevas páginas de aterrizaje para asegurar que cada componente funcione como se espera antes de que los clientes potenciales visiten. " Nbsp;
- Prueba de actualizaciones para problemas de compatibilidad, aunque WP Toolkit puede automatizar eso para usted con componentesbsp;Actualización inteligente.
- Crear un nuevo tema o editar su tema actual.
- Editar el sitio bordesquo;s código para añadir nueva funcionalidad. " Nbsp;
Los sitios de estadificación también son útiles cuando desea dejar que los desarrolladores y diseñadores trabajen en su sitio pero don simultáneamentersquo; no quiere darles acceso a la instalación de producción. " Nbsp;
nbsp;
Cómo configurar un sitio de WordPress Estadificación
Nosotros nos enfrentamos a los mismos; vamos a caminar a través del proceso de crear un sitio de estadificación y de implementar cambios de vuelta a la producción. Nosotros nos ocuparemos de utilizar los elementos clones y de estadificación en curvanbsp;WordPress Toolkit Deluxe.
Select.WordPress Toolkit Convenbsp;desde cPanel bordersquo;s menú principal de página y ampliar la vista detallada del sitio con el que desea trabajar. " Nbsp;
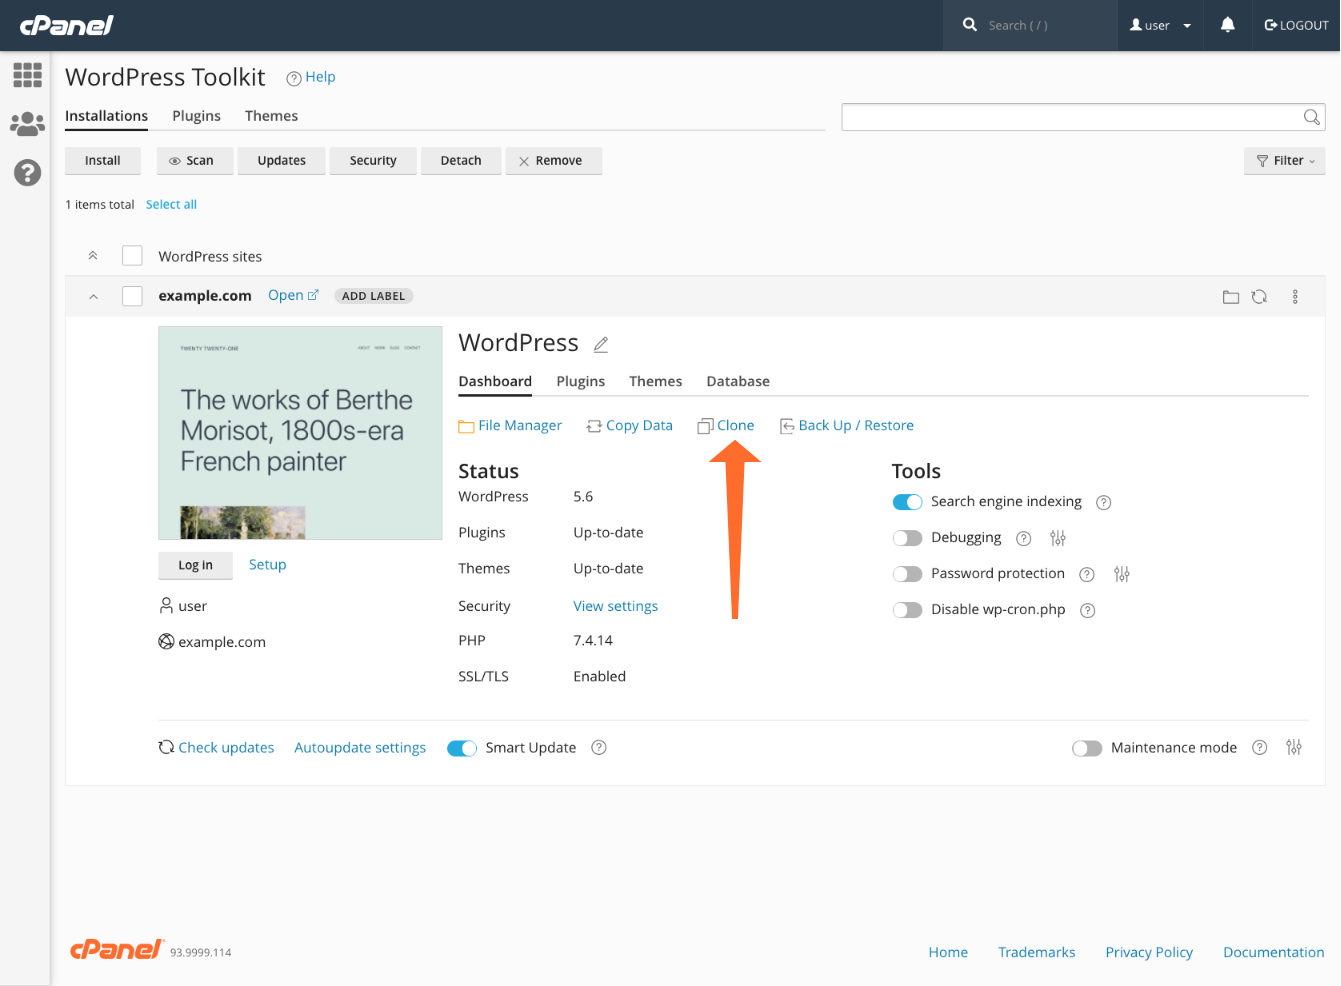
Haga clic en el botón .Clone plbsp;herramienta en la vista de panel. En el punto de vista de la crisis;Clone plbsp;interfaz, puede elegir el sitio de estadificación bordesquo;s subdominio y camino. El subdominio puede ser un dominio preexistente, o el Toolkit puede crear uno nuevo. Si es necesario, también puede cambiar el nombre de la base de datos. " Nbsp;
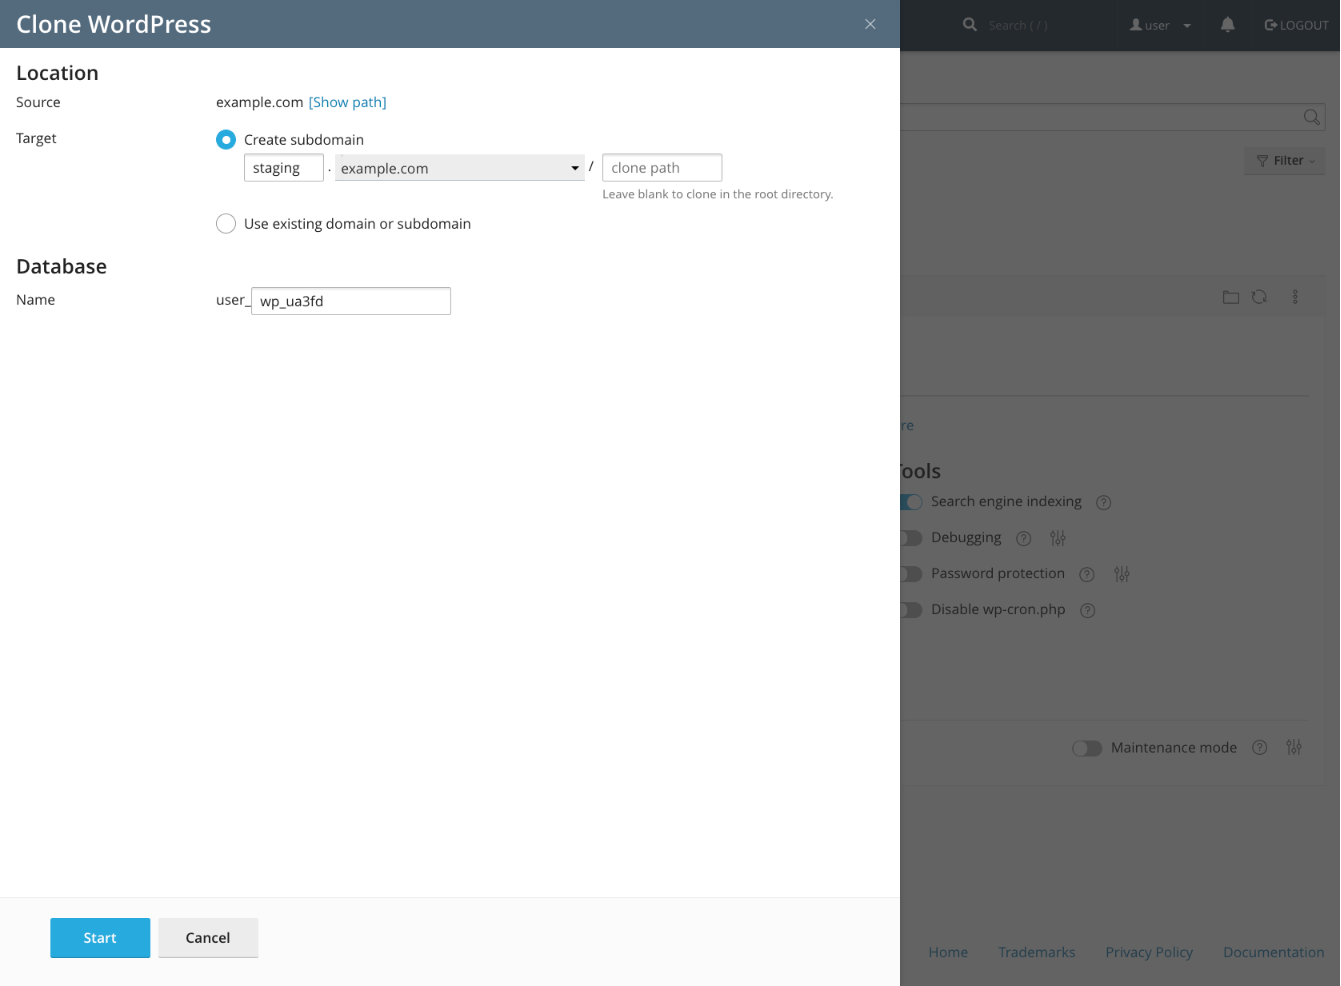
¡Eso es! El Toolkit creará ahora el sitio de estadificación y subdominio. Puede acceder al nuevo sitio en la interfaz principal de WPT junto a sus otros sitios. " Nbsp;
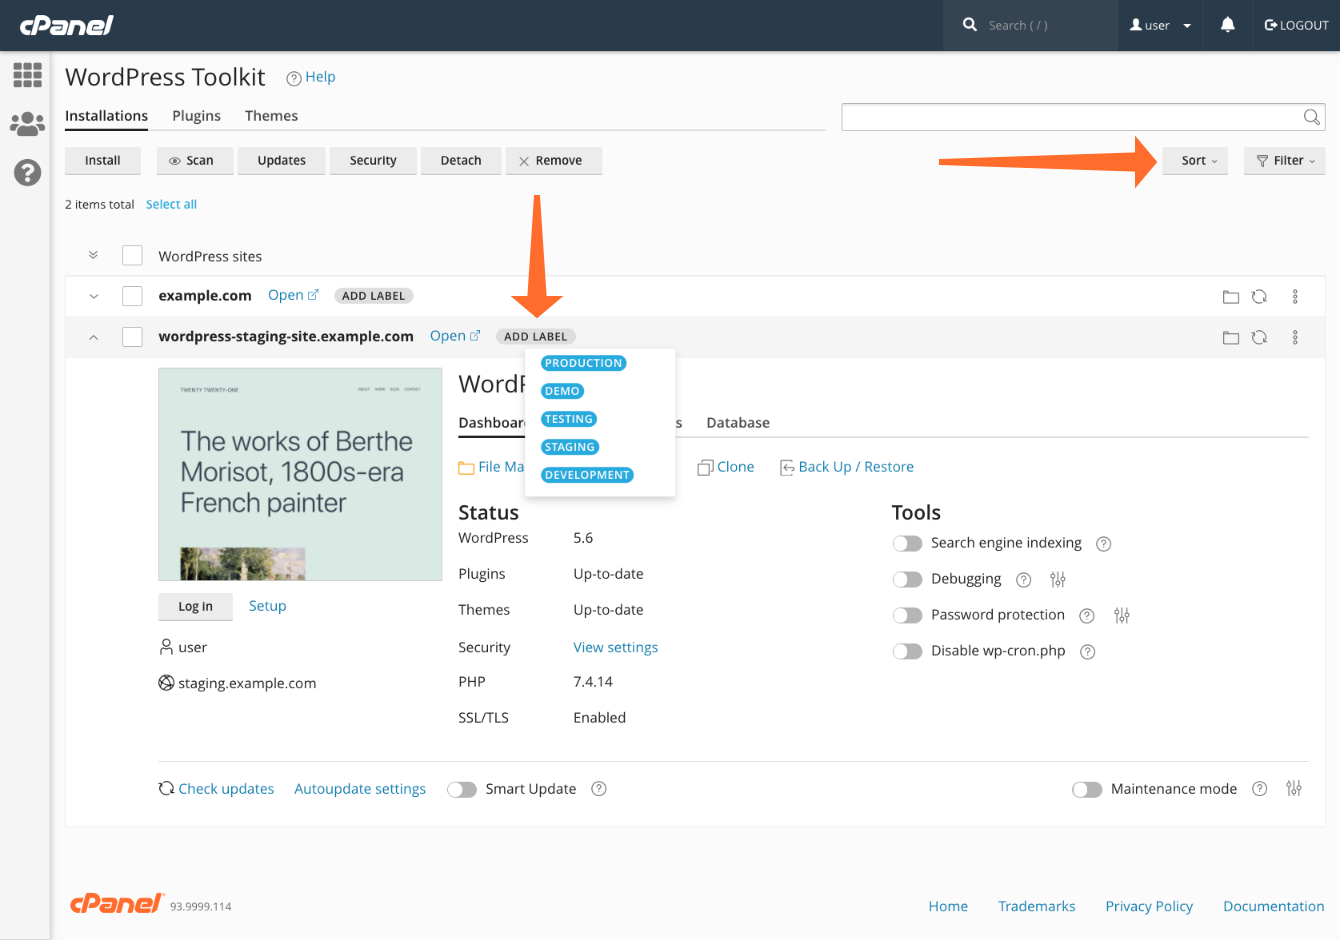
Para hacer los sitios de estadificación más fácil de distinguir de los sitios en vivo, utilice WPT plagasquo;s etiquetas. Click пров;Añada Label plaganbsp;y elegir una opción apropiada del menú desplegable.
nbsp;
nbsp;
Después de que los sitios sean etiquetados, puede ordenarlos y filtrarlos usando el Pulsp;Clasificar la cúpula;y cúmulosp;Filtrosdesplegable en la parte superior derecha de la interfaz. " Nbsp;
nbsp;
Comprobando cambios de sitio a la producción
Una vez que haya desarrollado y probado una nueva característica o diseño, se limitarsquo;s tiempo para empujar los cambios en el sitio de producción. Para ello, tenemos que copiar el sitio de puesta en escena de los clientesquo;s base de datos y archivos. Esto habría sido una vez un proceso complicado y prono-prono de error, pero se puede hacer con seguridad en menos de un minuto con WP Toolkit. " Nbsp;
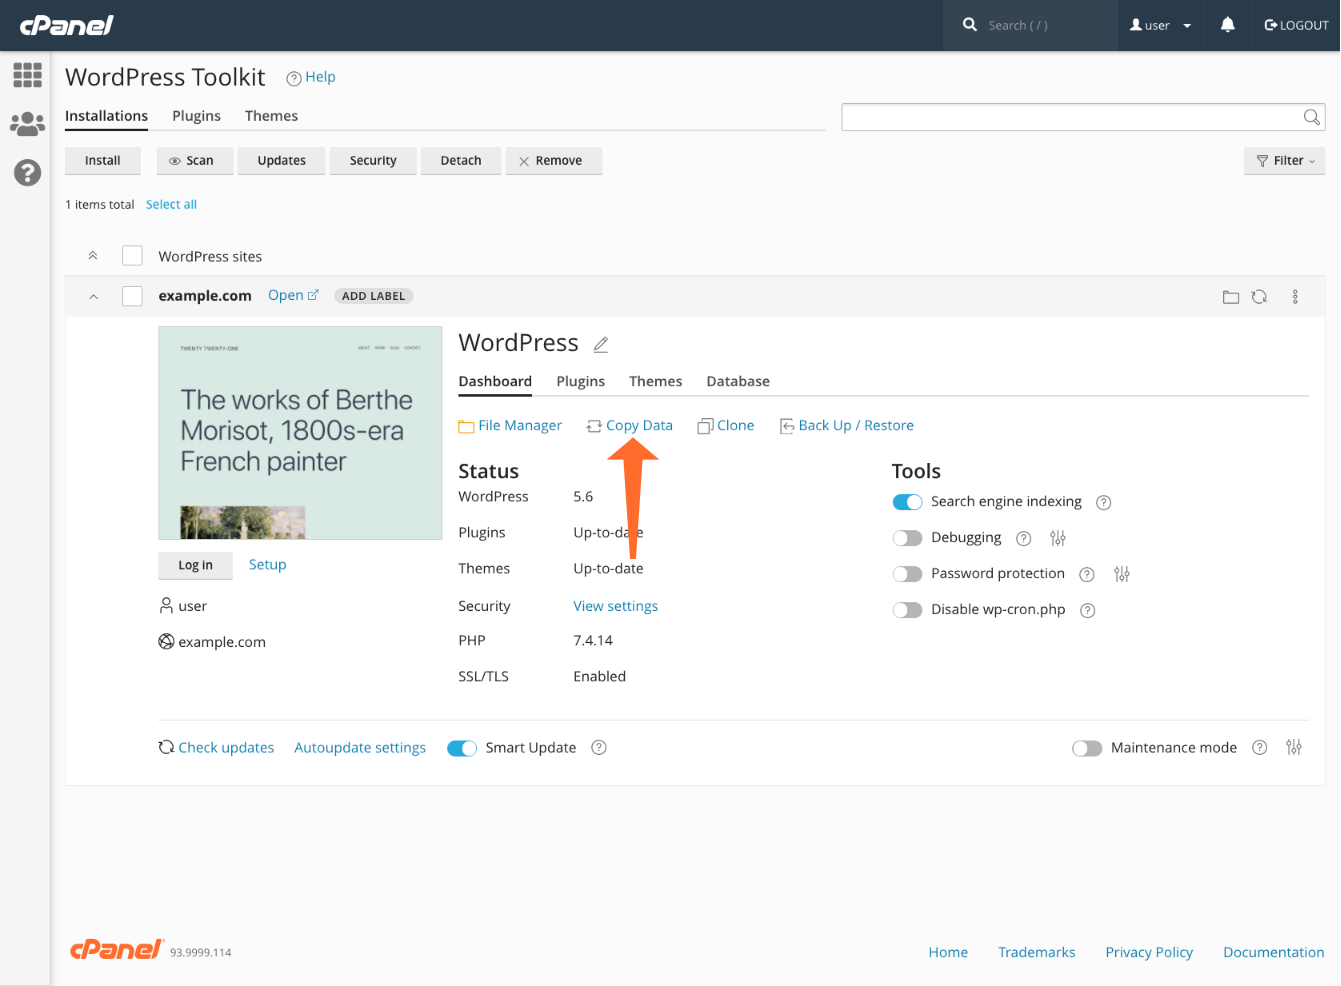
Haga clic en el botón .Copiar datosherramienta en el sitio de estancamiento de bordesquo;s WPT dashboard. " Nbsp;
nbsp;
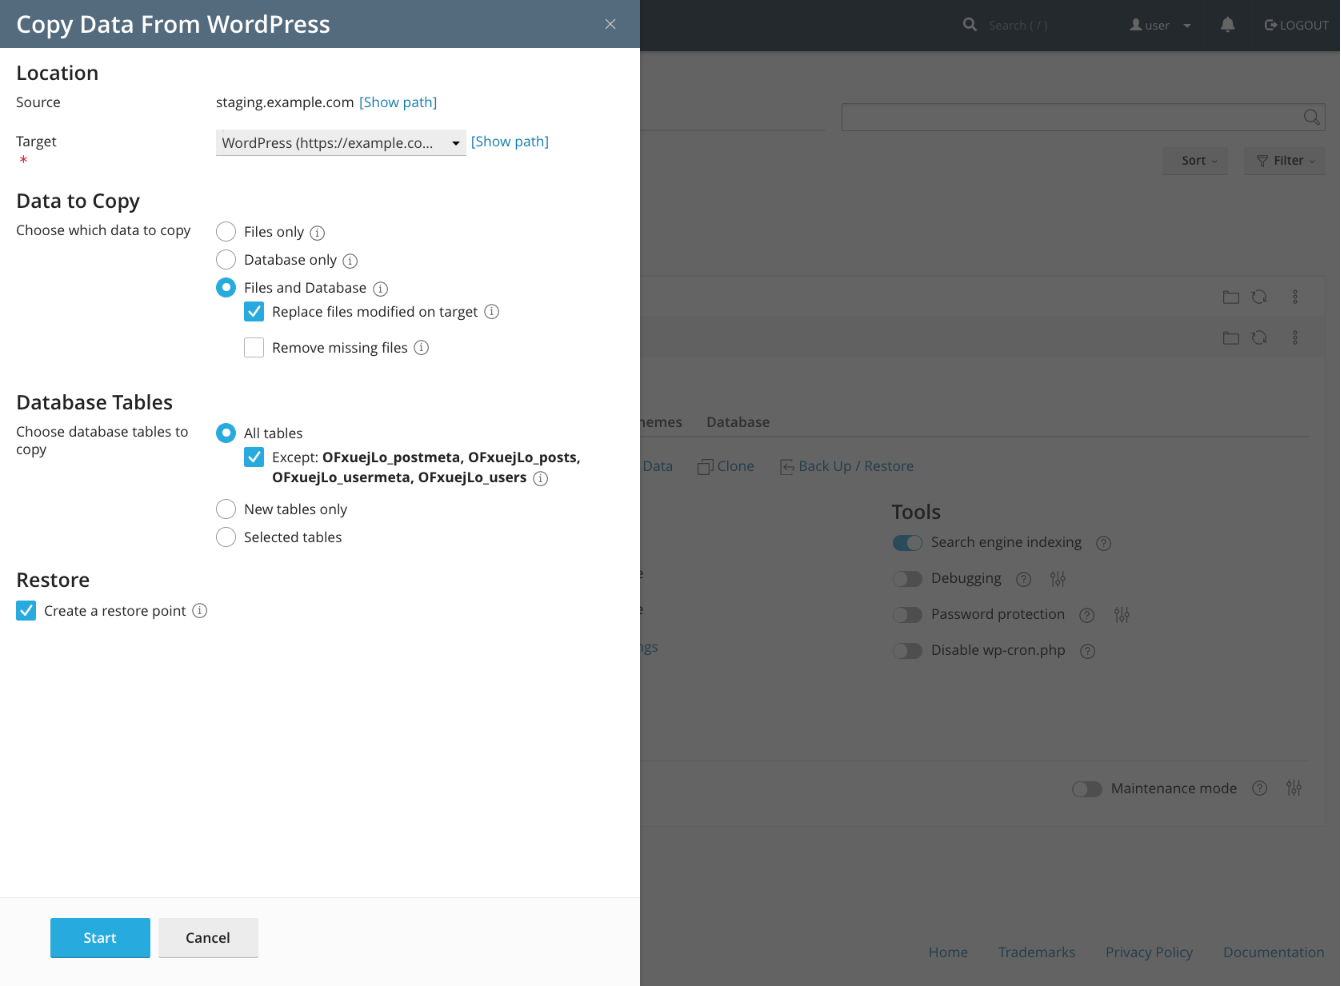
En el punto de vista de la crisis;Copiar datosinterfaz, seleccione el sitio de producción del нелит;Targetntbsp;menú desplegable. Usted tiene control bien arraigado sobre qué aspectos del sitio son transferidos. Puede copiar los archivos, la base de datos y las tablas específicas de la base de datos. También puede elegir si sobreescribir y eliminar archivos de producción si fueron editados o eliminados en el sitio de puesta en escena. " Nbsp;
nbsp;
En nuestra imagen de ejemplo, nos limitamos a copiar todo excepto la base de datos de clientesquo;s post y tablas de usuarios y sus metadatos asociados. Eso nos permite sincronizar las instancias de WordPress sin sobreescritura o eliminación de publicaciones y usuarios creados después de que hicimos el sitio de estadificación.
nbsp;
nbsp;
Debido a que copiar puede ser una operación destructiva, WPT crea automáticamente un punto de restauración para que pueda volver rápidamente a rodar si algo sale mal. " Nbsp;
nbsp;
Juntos, WordPress Toolkit implicarsquo;s funciones de clonación y copia proporcionan un despliegue rápido y sencillo de usar. Puede crear un sitio de estadificación en segundos y empujar cambios a la producción tan fácilmente. " Nbsp;
nbsp;
Díganos qué tiene que estar levantado.
Una breve conversación con un ingeniero. Sin cita-bot, sin cola de callback.